Preaqueça o forno a 180°C. Em uma forma,
espalhe a aveia e leve ao forno por uns 15 minutos, mexendo algumas
vezes. Retire do forno e misture com o mel. Em uma taça ou copo pequeno,
coloque ⅓ do iogurte, ⅓ dos morangos fatiados e ⅓ da aveia com mel.
Repita a operação mais duas vezes e está pronto o seu café da manhã.
I can’t begin to tell you how sad I am that this is the final week, fine three days of #CookforJulia.
I’ve been having a blast the past week cooking up Julia Child recipes, reliving Julia recipes and reading tributes to her on PBS food and at various food bloggers sites.
PBS was even nice enough to put a few The French Chef episodes on
their website for us to watch. Since I don’t have cable, it’s been
forever since I’ve watched an episode. I look a lazy weekend for myself
this past one and sat at home and watched a few.
My final two Julia recipes this week are in
the sweet category. I had enough savory last week. I’m not calling
this dessert because in all honesty clafoutis can be served for
breakfast, brunch or dessert.
It is isn’t so sweet, that you feel like a complete sugar bomb first
thing in the morning. The custardy center and crisp edges are
reminiscent of a dutch baby pancakes. Plus any sweetness we have is
offset by the tartness of your cherries.
Recipe type: Breakfast, Dessert, Fruit
Cook time:
Total time:
Serves: 6-8
Ingredients
3 cups fresh Bing cherries, pitted
1¼ cup whole milk
⅔ cup granulated sugar, divided
3 large eggs
1 tablespoon pure vanilla extract
⅛ teaspoon salt
½ cup all-purpose flour
½ tablespoon unsalted butter
confections sugar for decoration
Instructions
Pre-heat your oven to 350 degrees F.
In a blender,
place in the order listed above the milk, ⅓ cup sugar, eggs, vanilla,
salt and flour and blend on high for 1 minute.
With a flame proof
7 to 8 cup baking dish (I used my skillet), butter the dish, making
sure to cover all sides. You may not need the entire ½ tablespoon of
butter.
Pour a ¼ inch
layer of batter into the baking dish, set over a moderate flame. Cook
for a minute or two until the batter just begins to set.
Remove from heat and evenly spread the cherries over the bottom. Sprinkle the remaining sugar over the cherries.
Pour the remaining batter into the dish and smooth the surface if necessary.
Bake for one hour,
in the the middle of your oven. The clafoutis is done when it has
puffed and is nicely browned. You can check for doneness by inserted a
knife into the middle, if it is clean, it is finished cooking.
Sprinkle the top with some confectioners sugar just before serving.
Notes
The clafoutis does not need to be served hot, it is just as delicious
warm, or at room temperature. It will also sink down slightly after
cooling.
Ummm. . can someone please tell me where the summer went? How is it almost Labor Day?
Seriously, I’m looking through my archives and somehow I’ve gotten
through all of June, July and mostly August with nary a peach, zucchini
or corn recipe in sight.
Okay fine, I might have gotten a little crazy with the pesto recipes,
as well as all the ice creams, and then Julia Child’s birthday
celebration had to get thrown into the mix!
I’ve got your corn and zucchini recipe coming up, but for today let’s talk peaches.
Not just peaches though, I’m throwing my new favorite fruit of the summer into the mix too – PLUOTS!! I briefly touched
on my discovery of the fruit last week, and I’m so obsessed with them,
that I purchased 3 out of the 4 varieties I found last week.
Once again, pluots are a plum and apricot hybrid. They have a
relatively short season, can be found in the late summer and are sweet
and less acidic. You get the tart taste when you first bite into the
skin but the rest is pure sweet joy. They come in many varieties, and
each more delicious than the next.
For this crisp, I decided to skip removing the skin. It’s the end of
the summer, it’s time to be lazy and rustic. If you don’t care for
fruit skin in your tarts – a tutorial can be found here.
Can’t find pluots near you? Throw a few apricots into the mixture of
plums and peaches then, like I said we are being rustic – lazy – no one
will notice and everything will still taste just as fabulous.
Peach and Pluot Biscoff Crisp
Author: Susan Palmer
Recipe type: Dessert, Fruit
For my crisp topping, I swapped out my standard
brown sugar/cinnamon mixture for crushed Biscoff cookies. The end result
was a slightly spicier (due to the cookie) and more crisp topping.
Ingredients
3 large yellow peaches, cut into ¼- 1/2 inch slices
8 assorted variety pluots, cut into ¼ -1/2 inch slices
⅓ cup granulated white sugar
¼ cup all-purpose flour
juice from ½ lemon
For the crisp topping
¾ cup all-purpose flour
6 tablespoons unsalted butter, room temperature, cut into ½ inch pieces
1 cup Biscoff cookies, crushed
Instructions
Pre-heat your oven to 350 degrees F.
In a large bowl, toss together your peaches, pluots, ⅓ cup sugar, ¼ flour and lemon juice. Let sit for 5 minutes.
In a small bowl,
mix together the remaining flour, butter and crushed Biscoff until well
combined and the texture looks like sand.
In a 3 quart
baking dish, pour in the fruit, including any juices that might have
accumulated at the bottom of the bowl. Smooth out the top and sprinkle
an even layer of the Biscoff crisp topping.
Bake for 30 minutes until the fruit is soft, bubbling and the crisp topping is lightly brown.
Let cool slightly before serving.
Suggested serving is with a scoop of vanilla ice cream.
Notes
An alternate preparation is to bake the crisp in individual servings.
I would suggest you would need about 8-10 baking dishes depending on
the size. Baking time would remain the same.
How do you do Christmas? Do
you jump right in, as soon as the Thanksgiving leftovers are packed
into the fridge? Do you deck the halls as soon as you hear the first of
many Christmas carols on the radio? Do you protest and wait until the
calendar reads December 1? Do you prefer to go The Grinch route and
reject all things holiday?
Normally, I am a
feet-first, tree is up, let’s blast Mariah Carey’s “All I Want For
Christmas” kind of gal. But this year, as soon as I cleared the house
of fall décor and swapped out the front door wreath, I panicked. I
realized that I am completely over all the festive but cheesy Christmas
décor we’ve accumulated over the past three years in our home. I no
longer think the penguin and Santa stocking holders are funny, nor do I
want the plain, boring, $1 red and green Christmas stockings hanging
from them. I’ve always picked up a few things here and there, but this
will be our fourth Christmas in our house, and for once, I want
decorations that make me happy. I want decorations that aren’t thrown
around the house without much thought.
I’m making a list and checking it twice
ten times. I’m referring to my Pinterest boards and gleaning
inspiration from images I’ve saved. Do I want gold or silver? Colors
or neutral? Ornaments or candles? Where can I find the “nice”
evergreen garland? These are the problems that currently plague me. I
haven’t gotten much further than ordering a set of five pretty, matching
stockings to hang from the fireplace.
If these are my biggest problems this holiday season, I’ll take them. While
there may be a temporary shortage of Christmas decorations in our
house, there is no shortage of goodies. I didn’t hesitate at all when
it came to starting my holiday baking.
What we lack in mantel décor, we make up for in sugar and flour.
Preheat the oven to 350 degrees F. Line a 13×9-inch baking dish with parchment paper and baking spray.
In a medium bowl, combine melted butter with brown sugar. Allow to cool to room temp. Once cooled, beat in the eggs, one a time. Add vanilla.
In a separate bowl,
combine dry ingredients: flour, baking powder, salt and cinnamon.
Slowly add dry mix to the butter and sugar mix. Fold in cranberries and chocolate chips.
Spread the batter into
the pan. (Batter will be very thick.) Bake for about 20 minutes or
until a toothpick comes out clean. Remove to a wire rack to cool
completely.
Meanwhile, prepare your frosting by beating the cream cheese and the powder sugar until combined. Add half of the melted white chocolate and continue to mix.
Frost blondies and sprinkle with chopped cranberries. Use remaining chocolate to drizzle. Cut into triangles and serve. Store in fridge if not serving immediately.
The word “unique” is so often over-used, it seems to have lost its
meaning. Certainly in the food & beverage industry, this is truer
than ever. So when I had the opportunity thanks to the kind folks at Sizzling Communications, to visit a new establishment that truly warranted the adjective unique, I found myself somewhat at a loss for words.
Located in Leslieville on Queen Street East, the warm and inviting Rakia Bar features – you guessed it – rakia (also rakija, rachiu).
Rakia is a spirit made from distilled
fermented fruit, other than grapes. (You could think of it as a fruit
brandy.) It’s popular in the Balkans, with an ABV of 40% minimum –
sometimes clocking it at as high as 60%. Generally clear, it’s usually
bottled direct from the still without ageing in casks, thus maintaining
the fruit characteristics in the final product. Even at 40% ABV, rakia
tends to have a bite! Serbian Slivovitz (made from plums) would be the most well-known internationally.
It’s
the most popular alcoholic drink in Serbia, and tends to be served with
appetizers and savoured slowly in a social setting with good friends. A
predominant part of the culture, custom includes placing a bottle in
the grave of drinkers, to enjoy in the afterlife!
It is immersed in this culture that Rakia Bar thrives. Apart from an
in-depth history lesson, we were walked through a structured tasting of
six different rakias. Each was presented in a traditional chokan,
a small (30mL) pear-shaped glass with narrow opening from which rakia
is sipped. While beautifully authentic, I did find it helpful to pour a
little in a small snifter for the tastings as a novice, to better
appreciate the differing bouquets.
And indeed, they are remarkably different. There is much for variety than most who have only tried a harsh slivovitz in the past would expect. Amongst the five we tried, each had a distinctive profile.
The quince had a nose that immediately had me
thinking of Turkish delight. (perhaps not a surprise, given quince is
part of the rose family.) It hit you with immediate heat, but at the
same time was remarkably smooth. A nice introduction. The pear
was unmistakable, with a strong aroma of over-ripe pears hiding the
alcohol. On the palate, the pear was there, subdued by the alcohol burn
and notes of caramel. The apricot had a milder fruit
nose, with hints of nuts. On the palate, I found this one more
restrained, warming instead of burning. This would be a favourite
after-dinner sipper. The plum had been aged for a time
in oak, giving it a light golden colour. The nose was surprisingly
light, plum in the background and (for me) – don’t laugh – a distinct
nose of white LePage glue! I found this a bit more fiery, with a finish
that was slightly bitter. Moving on to flavoured rakia, we tried juniper;
really a plum rakia where juniper is added in the second distillate.
As expected, strong juniper notes reminiscent of gin – unexpected from
the medium golden colour. As a gin drinker I liked this immensely.
Even moreso in the rakia & tonic the very friendly bartender made
me, with added lime. Lastly, we tried honey; again, a
plum rakia with added flavouring. This was slightly opaque, similar in
appearance to a pastis with water. The nose featured more bitter almond
than honey. But as soon as you sip, you’re stung with the flavor!
This was the most subdued of the selection, ideal for those who might
have trepidations about a high-alcohol drink. Very smooth and warming
through the finish.
In Serbia, most rakia is made by very small producers. Dušan Varga,
the owner of Rakia Bar, clearly knows how to source, and has a rotating
stock. Some now produce only for his bar.
Rakia also represents good value, as fruit is generally cheaper to
farm than grapes. At Rakia Bar this translates to 1-ounce glasses
starting from as low as $6.50. For some of the higher-end exotic rakia,
you could spend $35.00. Still, compared to a Cognac or Armagnac…
As rakia is meant to be sipped slowly, the evening featured some lovely mezze
plates, matched to each of the different rakia. Along with fruits and
nuts, we had pork crackling, duck neck sausage, cheeses, chocolate, and
my personal discovery of the evening – kajmac, a creamy dairy spread similar to clotted cream.
The brunch menu is varied, and features a grilled cheese that has
rave reviews. I’ll let you discover that on your own. As well as a few
special rakia cocktails they’ve had fun experimenting with.
All in all, I found this a fun evening of discovery, and if you’re in the east end, Rakia Bar is well worth checking out – for the rakia, and also the food.
Rakia Bar
1402 Queen Street East
Unit B, Toronto
Tel: 416-778-8800
Hours:
Mon – Fri 5pm to 2am
Sat – Sun 9am to 2am
Disclosure: Neil attended the rakia
tasting evening as a guest of Sizzling Communications. All opinions are
his own and he has not been compensated for writing thispost.
Hmmm, well it sounds like Mr Neil had a great night out at Rakia Bar,
as for me, well I didn’t go primarily because I tend not to like hard
liquor like these fruit brandies (though his description, especially of
the apricot, made me wonder if I should give them another try…).
However, cooking and baking with liquors like this is another matter.
And as we approach the holiday season, I couldn’t think of a better
recipe in which to use an fruit brandy than a classic trifle.
In my family, trifle used to be a traditional Christmas dessert when
we would get together with family, so naturally, when I think holiday
entertaining, I find it hard to go past a trifle for a dessert. No, it’s
not haute cuisine, but it’s lovely and jolly and benefits from a good
old glug of alcohol (as, indeed, do those who are indulging!).
Mini trifles for the holidays
Author: Mardi Michels
Recipe type: Dessert
Prep time:
Total time:
Serves: 4 individual trifles
Mini trifles are slightly more elegant that one large one and it allows you to be creative with your ingredients.
Ingredients
approximately 12 thin slices pound cake
about ½ cup of rakia or fruit brandy/ eau de vie/ Poire Williams/ Calvados
approximately 4 cups prepared custard or pastry cream
4 cups mixed berries, sliced in halves if they are larger
4-6 tablespoons whipped cream
Instructions
Briefly soak the pound cake slices in the fruit brandy. Don’t let it get too soggy.
In tumbler-style glasses, layer the cake, berries and custard alternately.
Top with dollops of whipped cream.
Serve immediately
or cover tumblers with plastic wrap and refrigerate until needed – not
too long though otherwise the cake will completely collapse into a
puddle of brandy.
I admit that I REALLY liked the extra kick that the fruit brandy lent to
this. So often a sherry is overpowered in a trifle by the other
ingredients, namely the custard, but a stronger liquor can stand up to
this. Try it this holiday season!
No. I haven’t jumped into my TARDIS and flown into the future to December 31st.
Sunday, September 16th marks the eve of Rosh Hashanah or the Jewish New Year.
Like the good Jews that we are, we celebrate the holiday surround my food.
Many symbolic foods are eaten during this time as an omen for a good year ahead.
The most well known being apples and honey for a sweet year ahead.
Instead of the usual long braided challah, we turn to a sweeter round to
symbolize the cycle of the year. Other foods, such as pomegranates,
dates, string beans, or leeks wish for prosperity or good health in the
coming year.
*******************************
To celebrate I am joining in the first ever Jewish Holiday Blog Party, hosted by Jessie of Taste and Miriam of Overtime Cook, and sponsored byKitchen Aid! Jewish bloggers from all over the world are celebrating with all kinds of twists on traditional Rosh Hashanah foods.
To kick off the celebration, Levana Kirschenbaum is giving away a copy of her fabulous new book, The Whole Foods Kosher Kitchen to threelucky
winners. To enter, leave a comment on this post of your favorite food
to eat during the Jewish Holidays. Limit one entry per reader per blog, so
click over to the other participating blogs below for your chance at
additional entries! Giveaway ends 5 am eastern time on September 11th,
2012.
*Prize is sponsored by Levana and available to readers from
all blogs participating in the Rosh Hashanah Blog Party. Prize can only
be shipped within the US.
Honey Caramel Apple Galette
Author: Susan Palmer & Alice Waters (pastry dough)
Recipe type: Dessert, Fruit
A galette is a free form pie, don’t worry if it
isn’t rolled out perfectly round or if one side ends up with a little
more dough than the other – it is meant to be rustic looking. While
building your galette if the dough gets a little warm and sticky, just
put it in the freezer for a minute or two to firm things up.
Ingredients
For the pastry dough – adapted from Alice Waters:
1 cup all-purpose flour
½ teaspoon granulated sugar
⅛ teaspoon salt
6 tablespoons, cold unsalted butter, cut into ½ inch pieces
3½ tablespoons cold water
For the galette:
2 pounds tart apples, peeled, cored and sliced into ¼ inch pieces
juice from ½ lemon
2 tablespoons granulated sugar
⅛ teaspoon salt
For the honey caramel:
½ cup granulated sugar
½ cup honey (any variety)
4 tablespoon butter
1 cup heavy cream
1 teaspoon vanilla extract
½ teaspoon kosher salt
Instructions
For the pastry dough:
In a medium mixing
bowl, mix together the flour, sugar and salt. Using a pastry blender,
two knives or your hands add the butter – 2 tablespoons at a time and
blend until the mixture looks like pebbles.
Dribble in the
water until the dough just comes together, make sure there are no dry
patches and it easily forms into a ball. You may not need all the water.
Place on a lightly
floured piece of plastic wrap, pat into a disk and refrigerate for at
least 30 minutes. Dough can be made ahead.
Forming the galette:
Pre-heat your oven to 400 degrees F.
Line an un-rimmed baking sheet with a silpat or parchment paper.
In a medium bowl, mix together the sliced apples, lemon juice, sugar and salt. Set aside.
On a lightly
floured surface, roll the dough out to about 10-12 inches in diameter or
¼ inch thick. Carefully fold up the dough and transfer to the lined
baking sheet.
Arrange the apple slices as you see fit, leaving a 1½ to 2 inch border.
Bake for 35 minutes or until the crust is lightly browned.
For the honey caramel:
While the galette is baking, place the honey and sugar in a medium-sized heavy bottomed sauce pan over medium heat.
Cook until the
honey and sugar has dissolved and start to caramelize, this will happen
very quickly so make sure not to turn away. You want the caramel to be a
dark golden brown – temperature wise it will be at about 250 degrees.
Swirl in the
butter one tablespoon at a time and then with the pot away from the heat
carefully pour in the heavy cream. If the caramel seizes place back
over the heat to cook until liquid again.
Stir in the vanilla and salt and set aside to cool.
The caramel will thicken as it cools.
Finishing the galette:
After the initial
baking time, remove the galette from the oven and brush the honey
caramel all over the top and around the crust.
Return to the oven and bake for another 10 minutes, until set and glazed.
Let cool slightly before serving. Serve with additional caramel sauce.
Confession time. For the longest time I refused to eat cooked apples. In all honesty, I refused to eat any cooked fruit.
I don’t know what it was, the texture, the fact that it was warm, but
I just didn’t like it. Therefore up until the last year or so I didn’t
really appreciate pie. I know, PIE. If pie was around me, I’d eat the
crust and leave the rest.
Then something changed, call it maturing (I refused to say getting
older), but I started to like cooked fruit. The mushy apples didn’t
bother me as much. Pass over that apple pie. Apple cake? Sure, I’ll
have a slice! Homemade applesauce? You bet! The jarred stuff? Eh,
still not a fan, too sweet and baby foodish for me.
Fall is in the air and apples are finding their way into my CSA
basket. I love apples, and now I don’t mind cooking with them.
Apple Walnut Coffe Cake #SundaySupper
Author: Susan Palmer
Recipe type: Dessert, Breakfast, Fruit
I’ve had the base recipe for this cake sitting
around for years. I originally scribbled it down from my Aunt after she
served it for brunch one afternoon. My husband loved it so much, he
insisted that I get the recipe. Where the source is from, I have no
idea! All I know is that it was a kosher cookbook because there was no
dairy listed. A few swaps, plus some apples and walnuts and we have a
new cake!
Ingredients
1 cup granulated white sugar
1 cup (2 sticks) unsalted butter, room temperature
1 teaspoon pure vanilla extract
3 large eggs, room temperature
3 cups all-purpose flour
3 teaspoons baking powder
¾ teaspoon baking soda
1 teaspoon salt
1¼ cups whole milk
1 lb. apples, peeled, cored and cut into ½ inch dice
¾ cup toasted walnuts, chopped
½ cup granulated white sugar
2 teaspoons cinnamon
3 teaspoons cocoa powder
Instructions
Pre-heat your oven to 375 degrees and grease and flour a bundt pan.
Using a stand or hand mixer, cream the butter and sugar until light and airy – about 2-3 minutes
Add the eggs one at a time until well combined and then whisk in the vanilla extract.
In a medium bowl, whisk together the flour, baking powder and soda, and salt.
Alternating
between the dry ingredients and the milk in three parts – starting with
the dry, beat together until combined, careful not to over mix.
In a small bowl,
combine the filling for the cake, stir together the walnuts, remaining ½
cup sugar, cinnamon and cocoa powder. Set aside.
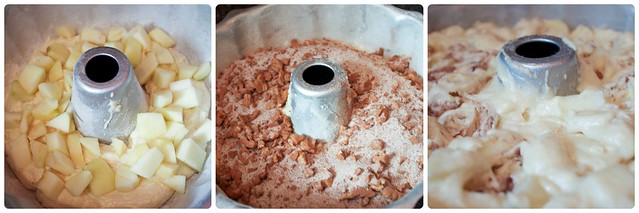
To build your
cake, spoon about ¼ of the batter into the bottom of your bundt pan.
Spread ½ of the apples around the batter and add another ¼ of batter.
Scatter the walnut mixture over the batter, then more batter (it will be
difficult to smooth out, it is okay if it isn’t perfect). Finally, add
your remaining apples and smooth the remaining batter on top.
Next take a long
skewer and insert it into your cake batter and carefully make small
swirls – this will give you the lovely swish once the cake is baked.
Bake for 45-50 minutes, insert a toothpick to test that the cake is done.
Let cool completely before inverting the cake from the bundt pan onto a platter.
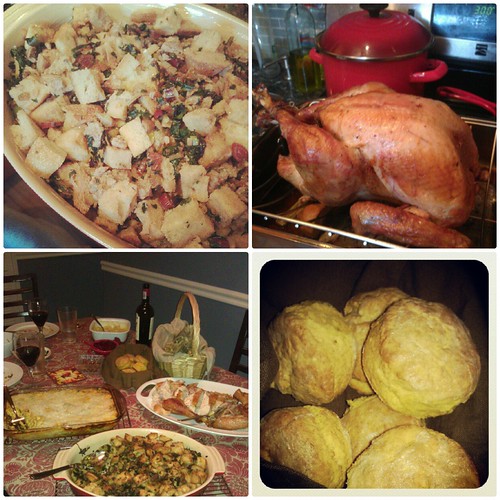
I’m back! Not that I went that far, but I did take a little Thanksgiving blog break last week.
I hope everyone had a lovely Thanksgiving holiday. I usually do a
big post on what we served for T-day, but it was just hubs, pugs and I
this year as I was flying out the next day for a business trip.
However, I still cooked up a storm, as you can see the highlights
below. I might have gone a little crazy for a dinner for just two people!
So on to these muffins – these muffins are perfect for all those
leftover fresh cranberries you have sitting in your fridge. I’m not
talking about the cranberry sauce, but the actual cranberries. I don’t
know about you, but I certainly didn’t the use the entire package I
purchased and even if you did use the whole bag, go buy some more to
make these muffins.
Orange cranberry muffins just call out the holiday season studded
with bright pretty red cranberries and scented with just a bit of orange
zest and juice. This is the time to get your citrus and fresh
cranberries after all!
Whipped easily together without a mixer, it’s a quick breakfast treat
perfect for any morning and they are made with low-fat Greek yogurt –
so you know kind of guilt free.
Orange Cranberry Muffins
Author: Susan Palmer
Recipe type: Muffins, Bread, Breakfast, Brunch
Ingredients
Dry Ingredients:
2 cups all-purpose flour
1 teaspoon baking powder
½ teaspoon baking soda
¼ teaspoon salt
½ cup granulated white sugar
zest from 1 orange
Wet Ingredients:
1 cup Greek yogurt (I used 2%)
¼ butter, melted and cooled
1 large egg
juice from 1 orange
1 cup fresh cranberries
Instructions
Pre-heat your oven
to 350 degrees F. and line a baking sheet with muffin/cupcake liners or
spray with baking spray if not using liners.
In a medium bowl,
whisk together the dry ingredients. Remove 1 tablespoon of the dry
ingredients and toss it together with the fresh cranberries – set aside.
In a small bowl, whisk together the Greek yogurt, melted butter, egg and orange juice.
Form a well in the center of the dry ingredients and mix in the wet, stirring to combine but careful not to over mix.
Fold in the cranberries, making sure to evenly distribute through the batter.
Using an ice cream scoop or a small ladle, evenly fill the muffin cups with the batter.
Bake for 25-30
minutes or until a toothpick inserted in the middle comes out clean.
Remove from the tin and let cool on a wire rack before serving.
Remember last week when I had my Jamming Away Sunday? I shared with you my Cranberry Orange Quick Jam
and I also mentioned that I made Pepper Jelly too! My description
last week for the Pepper Jelly was dam hot, curl your toes jelly!! I
honestly thought it was too hot and that was coming from me!! The
Pepper Queen!! Well not anymore!! Woohoo!!!
On Thanksgiving I was craving something spicy to munch on, since I
filled my morning with tomorrow’s post that I didn’t know what to make.
What could I have that would satisfy my craving? Then I remembered I
had Pepper Jelly. I haven’t tried it yet, but I was afraid it was to
hot, but I couldn’t leave it in the fridge untouched so I opened up the
jar, smeared some cream cheese on my homemade Lavash Crackers and
sprinkled the top with Pepper Jelly Jam. I took the first bite and I
was in heaven!! I couldn’t believe how good it was! I missed out all
week on it!! It was dam good, so good that I couldn’t stay away! I
had jelly dripping on my shirt, on the counters, on the camera and now
it’s on the keyboard! Well worth the stickiness !! It
is unbelievably good!
I got the recipe for the Pepper Jelly Jam from Chris from Cafe Sucre Farine.
If you’re a regular reader of mine, you know that I love Chris’s Blog.
She makes the most wonderful dishes! I have tried a ton of her
recipes and none have ever disappointed me. I honestly think she
should open a Cafe and share all of her delicious recipes. But anyway, I
went to make her recipe and as I was making my Jelly I realized I
didn’t have all the ingredients. I’m not a good planner when it comes to
things like this!! I see one ingredient and buy it and never pay
attention to the rest, so silly of me! Maybe I should learn to print
recipes instead of trying to remember them! Anyway, I didn’t have
enough apple cider vinegar, no pectin and I couldn’t use all of that
sugar. So I made do with what I had and what I got was
a fabulous jelly!!
To substitute for the pectin, since I wasn’t canning my jelly, I
decided to use a granny smith apple since an apple contains natural
pectin. For the apple cider vinegar, I used some distilled vinegar, and
added less sugar. I wasn’t sure if mine was going to turn out. I had
quite a bit of liquid in my jelly. So when I placed the jelly in the
jar I discarded some of the juice. I probably shouldn’t have done that
because the juice is amazing!!!
The whole process probably took me about 45 minutes to make. Well
worth the time! The jelly has a sweetness to it, yet it does have some
heat, but not so much were you need to drink some water or get a stomach
ache. It’s really perfect! When I tested it when I made it, it was
truly to hot for me, that I added another sweet bell pepper to it to
bring the heat down. Good choice on my part!! The jelly is so good
that you could eat it straight from the jar. In one sitting I ate a 1/4
of the jar!! I could have ate more, if it wasn’t so close to dinner
time!
I’m really glad that I made the jelly and I was so excited to share
it with you, that on Thanksgiving Day I am writing this because I
couldn’t wait to tell you and I wanted my emotions for the jelly to
show. Sometimes when you try something new and you wait to share it,
the enthusiasm isn’t there anymore. I had to be sure you knew how much I
love it!!! If you want to check out Chris’s Jelly, which looks
perfect, you can go to her blog Cafe Sucre Farine and find it there, along with her other wonderful recipes!! Tell Chris I said hello!
Pepper Jelly
Prep Time: 5 minutes
Cook Time: 35 minutes
Total Time: 40 minutes
Yield: 2 Cups
Serving Size: 1 Tbsp.
A sweet and spicy jelly made with sweet bell peppers, apples and jalapeno, perfect for topping on cream cheese.
Ingredients
2 cups red bell pepper, seeded, chopped small
1/2 cup jalapeno, deseeded, membranes removed, chopped small
1 apple (75 grams), peeled, cored, sliced small
1/2 cup apple cider vinegar
1/4 cup distilled vinegar
2 cup sugar
Instructions
In
a sauce pan add all the ingredients. Bring to a rolling boil. Reduce
heat to low and simmer for 30 minutes until it starts to thicken,
stirring occasionally. Let cool, store in a jar in the refrigerator.
It
is always so saddening to hear when a huge storm hits and people are
out of their homes and in temporary shelters only to live through the
aftermath to try and pick up the pieces of their lives and carry on.
This of course was the case with the devastation of Hurricane Sandy.
Here at #SundaySupper we are reaching out with Helping Hands to try to
offer our support to those in need.
Personally I think of bringing over food the second I hear of someone
in need, sick, newborn or tragedy. That is the way that I know how to
help out. I thought of Manhattan Clam Chowder and it being so
appropriate for this situation. A big thick and hearty chowder that will
warm the soul and help anyone through hard times.
I was trying to think of what to bring to this #SundaySupper but it
all came together when I brought home fish stock from a local vendor at
the Calgary Farmer’s Market. The Stock and Sauce Company
carries loads of different dips, pate, soups, chili, stews, stocks and
loads more. I haven’t had time to work on a good fish stock so when I
see it I put it into my freezer to create something fantastic with at a
later date. This was the case with the Clam Chowder you see here today. I
perused a list of ingredients in my head and put this wonderful soup
together for you. I hope you find it in your heart to donate to one of
the very worthy organizations that we have listed here. When we come
together we can make a difference.
It
is always so saddening to hear when a huge storm hits and people are
out of their homes and in temporary shelters only to live through the
aftermath to try and pick up the pieces of their lives and carry on.
This of course was the case with the devastation of Hurricane Sandy.
Here at #SundaySupper we are reaching out with Helping Hands to try to
offer our support to those in need.
Personally I think of bringing over food the second I hear of someone
in need, sick, newborn or tragedy. That is the way that I know how to
help out. I thought of Manhattan Clam Chowder and it being so
appropriate for this situation. A big thick and hearty chowder that will
warm the soul and help anyone through hard times.
A big hearty bowl of Manhattan Clam Chowder will fill you up and warm you to your toes!!
Recipe type: Soup
Author: Tara Noland
Prep time: 30 mins
Cook time: 35 mins
Total time: 1 hour 5 mins
Serves: 6
A thick and hearty chowder that will warm you to your toes!!
Ingredients
4 strips of bacon, cut into lardons
1 Tbsp. butter
1 onion, diced
2 cloves garlic, minced
16 baby carrots, sliced
2 celery stick, diced
1/3 cup flour
2/3 cup white wine
1 liter fish stock
28 oz. can diced tomatoes
1 tsp. thyme
1/2 tsp. crushed red pepper flakes
Salt and pepper to taste
12 baby red potatoes, cut into medium dice
1 lb. fresh clams
142 gm. can of clams
Instructions
In a large pot saute lardons until slightly
crisp, remove onto a paper towel. Drain fat from pot. Add the butter and
melt. Add the onions, garlic, carrots and celery and saute until the
onions are transparent and scrape up the bits of bacon from the bottom
of the pan.
Add the flour and stir for about 1 min. Slowly
add in the wine incorporating it into a paste. Slowly add the fish stock
until it loosen up to a soup like consistency, then add the tomatoes.
Add the red pepper flakes, thyme and salt and pepper. Bring to a boil
and let simmer for 10 min. Add the potatoes and simmer to 15-20 until
just tender.
Add the fresh clams and continue to cook for
about 7 min. until clams open up. Add the canned clams and stir to just
heat through. Serve piping hot with a big loaf of crusty bread.
There are many potential misconceptions
one stumbles upon when writing about frugal food. The delusion that
bothers me the most is that many people, frugal or otherwise, assume
that to be economically prudent one must always eat the least expensive
ingredients. Of course, such an approach will almost certainly allow one
to attain their financial goals, however, it can also be an extremely
dull path down which to venture. In fact, there are many ways to be
thrifty but to also enjoy the finer produce in life. This salmon and
prawn fish pie is a case in point – no one would immediately assume it
is a frugal recipe, but that it is. As your school teachers no doubt
informed you, one must never read a book by its cover.
The most important thing to remember when cooking with meat is that a little can be made to go a long way
– a rule that is particularly applicable to strongly flavoured meats
such as salmon and lamb. For instance, this pie – which easily fills
four – contains only two small fillets of salmon (£3) and 12 prawns (£1.25),
but one never feels one is missing out. You see, the flavour of each
constituent ingredient is so full that it is very difficult to lose in
even the most disruptive of flavour combinations. Secondly, ingredients
like fish and prawns freeze exceptionally well, so it is best to buy
them when they are cheap, for use later on. The salmon in this pie set
us back a mere 40p because it was bought the day before
its sell-by date. For more advice on how to enjoy the best ingredients,
whilst maintaining a frugal outlook
This fish pie is a really traditional
dish, the inclusion of boiled eggs is evidence of that. This may seem a
little strange to some of you, but the combination is extremely
effective and adds a whole new dimension to what can often be a slightly
boring affair. In fact, if you give this pie a try I shall have to
insist that the eggs remain part of the furniture… trust me on this one!
Salmon and Prawn Fish Pie
Serves 4-5
Ingredients:
• 2 small fillets of salmon
• 12 king prawns
• 2 hard-boiled eggs, quartered
• 1 pint of milk
• A pinch of freshly grated nutmeg
• 5-6 peppercorns
• 2 bay leaves
• 50g salted butter
• 2 tbsp plain flour
• A few sprigs of fresh parsley
• The juice of half a lemon
• 5-6 medium potatoes
• 50g cheddar cheese
Method:
1. First off, infuse your milk with
nutmeg, peppercorns and bay leaves by warming them together in a
saucepan for at least 30 minutes. Place the fish, prawns and egg in the
bottom of a deep casserole pan and squeeze over the lemon juice. Boil
the potatoes until cooked through and set aside.
2. Sieve the milk and transfer to a jug.
In a saucepan melt 30g of butter, add the flour and whisk to form a
roux. Gently fry the roux for 30 second before whisking in the infused
milk, leave over a gentle heat to thicken. Mash the potatoes with a
little milk and the rest of the butter, season well.
3. Scatter some parsley over the fish,
pour over the béchamel sauce, which should be the consistency of
custard. Top with the mash, followed by grated cheese and pepper. Pop in
the oven for 30 minutes at 180C, cook until golden. Serve with peas and
a hunk of bread.
Cost: As mentioned
above, if one knows how to approach the situation even expensive meat
such as salmon can be enjoyed frugally. I’ve factored in a realistic
price for the salmon used in this pie, but I think the price is still
exceedingly reasonable. Indeed, £5.80 for a hearty, filling fish pie isn’t a bad price at all, even though it is a little dearer than my usual offerings!
Twenty eight days ago, Hurricane Sandy, having already wreaked havoc
along the Carolina and Virginia Coasts, made landfall just south of
Atlantic City New Jersey, and began her wrath across the state and in
New York.
Since then, we have gone about our lives, took our kids trick or
treating, having our Thanksgiving meal just days ago. There are
thousands of New Jerseyians who have spent the last twenty eight
days,and will unfortunately spend many….many more days, rebuilding their
homes, their livelihoods, in many cases from the ground up.
Twenty eight days is long enough for most of us to move on to the
next news story and forget about these people who are left with little
help, but they are still filled with determination and hope.
So, the #SundaySupper team wanted to take this weekend after so many
of us gave thanks for all that we have, to remind everyone about those
who have so little left, and encourage you to help in any way that you
can.
If you’re like me, you are a bit leery of a lot of these places who
collect money for disasters, wondering just how much of your money will
actually make it to those you are wanting to help. This is why I was so
thrilled to hear about The Martin Truex Jr Foundation and their efforts to help.
Martin Truex Jr. was born and raised in New Jersey, and his hometown of Mayetta was severely affected by Sandy.
Most of his family still lives in the area,
and while they were fortunate in that no one was seriously hurt,
many sustained damages. It weighed heavily on his heart to do whatever
he could to raise money for the community, and is continuing to do so,
thanks in part to the many NASCAR fans that have stepped up to help him
help others.
Since Martin is our favorite
driver’s teammate, and Martin’s family are fisherman (one of , if not
the largest clam fishers in the country), I felt it only appropriate
that I finally take the plunge and try making New England Clam Chowder
in his family’s honor.
When I told Randall that I was going to be
making this, he kind of crinkled up his nose, telling me that he did not
like clams, but he would at least try it.
I told him that I knew that he would try it, but I also knew that not only was he going to try it, but he was going to like it.
I don’t think he was as confident as I was until he took that first bite.
I have been a fan of clam chowder for
years, and this creamy, rich bowl of comfort made Randall a fan, too.
Daniel ate a huge bowl too, so its a safe bet that I will be making this
again.
I had no idea that it would be so easy! If you have ever considered trying to make clam chowder, I say break out the pots!


 Rendimento: 1 parfait


")
")
")
")
")
")
")


