Translate

Kamis, 27 Desember 2012

Tropical Smoothies


Who doesn't want an ice COLD smoothie for breakfast? Try this YUMMY combo and you'll be HAPPY, I promise!


Tropical Smoothies
1 to 1 1/2 cups milk
1 (6-ounce) container pina colada or pineapple yogurt
1 ripe mango, cut into pieces (and peeled)
1 banana
3 to 5 strawberries
1/2 cup (or so) fresh pineapple
Couple handfuls ice

Blend all ingredients together in a blender until smooth. Enjoy with some yummy muffins for a tasty breakfast!

TIP: Feel free to add more or less of certain ingredients or switch out some of mine for something you prefer! I think some kiwi would be a great addition, along with a touch of coconut or coconut milk. Mmmm!

Strawberry Shortcake Trifle


Another great dessert to take to a FAMILY gathering! This is so easy, but always looksELEGANT and tastes fantastic. It's like SUMMER in a bowl (or trifle dish)—am I right?


Strawberry Shortcake Trifle

1 box Strawberry Danish, prepared according to “Fruit Sauce” directions
4 cups sliced strawberries
1 loaf angel food cake, cut into 1-inch cubes
1 (8-ounce) container Cool Whip

Combine the Danish and prepared strawberries and refrigerate for 1 hour. 

In a large glass bowl or trifle dish, place half the cake cubes. Top with half the strawberry mixture and half the Cool Whip. Repeat layers. Refrigerate at least 1 hour before serving. Makes 8 to 10 servings.

TIP: Make sure to dig all the way down when serving so everyone gets strawberries, cream, and cake! 


Creamy Banana Brownie Cake

After having the twins, a super SWEET neighbor brought us this yummy dessert and we fell in LOVE with it. I hope there are still some FRESH strawberries at your grocer that you can make this with. If so, I would do it TONIGHT!


Creamy Banana Brownie Cake
1 box "chewy" brownie mix, prepared in a 8 x 8-inch pan and cooled completely
1 small box instant vanilla pudding, prepared
1 small container Cool Whip
1 or 2 bananas, sliced
Strawberries, sliced
1 Heath bar

After baking and cooling the brownie, prepare the pudding mix with milk according to directions and let set. Stir in desired amount of Cool Whip; set aside. (I probably used about half of the container, if not a little more. Just do it to your taste!) Place the banana slices over the cooled brownie to completely cover and then top with the pudding mixture. Lay strawberries over top and then shave the Heath bar over all. Let set in the refrigerator at least 4 hours before serving.

TIP: I like the brownie to be thick, so for a 9 x 13-inch pan I used 1 1/2 boxes of brownie mix even though it said it was for the larger size pan. I'm sure you could double it for some extra goodness! Also, the combinations are endless for this recipe. If you love banana, try using banana pudding for a really strong banana flavor (though when you serve it with the vanilla, everyone will think it's banana pudding already). You could also do chocolate pudding and it would delish!

Raspberry Lemon Muffins


This is a recipe I found in a neighborhood cookbook. We LOVE muffins at our house and these are EXCELLENT! Spread some butter on one straight from the oven—itsHEAVENLY!


Raspberry Lemon Muffins
2 cups flour
1 cup sugar
1 tablespoon baking powder
1/2 teaspoon salt
2 eggs
1 cup cream or whole milk
1/2 cup vegetable oil
1 teaspoon lemon extract
1 1/2 to 2 cups fresh or frozen raspberries

Combine all ingredients in a bowl except raspberries. Gently fold in the raspberries. Spoon into muffin tin and bake at 400 degrees for 18 to 20 minutes, or until golden brown.

TIP: This would be delicious with other types of berries—strawberries, blueberries, you name it! You could also try using different flavored fruity extracts to mix things up as well.

Easy Winter Fruit Salad


This time of year, the FRUIT starts to get boring, doesn't it? Well, to dress it up a little, I like to make this super EASY salad. My family always enjoys it—it just seems like an extra special TREAT.


Easy Winter Fruit Salad
1 to 2 red apples (I like Gala or Fuji)
1 to 2 Granny Smith apples
2 to 4 clementines
2 bananas
1 container Yoplait blackberry or raspberry yogurt
1/2 to 1 cup Cool Whip, to taste

Chop the apples and place in a large bowl. Peel the clementines and put the segments into the bowl with the apples. Slice the bananas and add to the other fruit. Pour the yogurt over the fruit as well as the Cool Whip and mix all together. Chill until ready to serve.

TIP: The bananas and apples may turn brown if you make the salad in advance. Try tossing with some lemon juice, orange juice, or even pineapple juice before mixing into the salad to prevent browning. Also, another great addition to make the salad go a little farther . . . mini marshmallows and/or chopped nuts!

Blackberry Cheesecake Bread


Sometimes I just want some really YUMMY sweet bread. This recipe totally fills thatCRAVING! It's super simple and has just the right amount of TREAT factor to it—especially if you add the white chocolate chips as mentioned in the tip! Maybe you could whip this up for your SPECIAL someone in a couple of weeks . . .


Blackberry Cheesecake Bread
1 yellow or white cake mix
1 small box instant cheesecake pudding mix
3/4 cup water
3 eggs
1/2 cup applesauce
Dash of cinnamon, optional
3/4 to 1 cup slightly smashed blackberries (fresh or frozen)

Preheat the oven to 350 degrees.

Mix together the dry cake mix, dry pudding mix, water, eggs, applesauce, and cinnamon, if using. Gently fold in the blackberries until swirled throughout the batter. Pour into two loaf pans and bake for about 35 minutes, or until a toothpick inserted in the center comes out clean. Cool in pans for 10 minutes, then completely on a wire rack.

TIP: If your blackberries are extra juicy, you may want to drain them! Also, another great addition to this  recipe would be some white chocolate chips. Yum!

Mini Peach Pie Pockets


We always have tons of PEACHES, so I'm always trying to think of new ways to use them! I thought a peach PIE sounded yummy, but knew we didn't need a whole one. So, I made some MINI pies, and then FROZE the ones we didn't eat. Perfect!


Mini Peach Pie Pockets
4 cups peeled and chopped peaches
1 tablespoon lemon juice
2 tablespoons sugar
2 tablespoons brown sugar
1/2 teaspoon (heaping) cinnamon
1/4 teaspoon nutmeg
Dash of salt
1 box store-bought pie crusts, cut into fourths

 Combine all the ingredients in a bowl except the crust. Spoon the peaches into the center of each piece of uncooked pie crust and then fold over sides to enclose. Place on a parchment-lined cookie sheet and then brush with a little of the peach juice from the bowl. Bake at 450 degrees for 20 to 22 minutes, or until golden brown and filling is bubbling. Makes 8 mini pies.

TIP: You could brush the top with butter to help it brown better, but I figured the sugary juices would be yummy. Obviously you can serve this with vanilla ice cream (my family's number one choice!) or whipped cream.

Raspberry Oreo Ice Cream

We love homemade ICE CREAM at our house, and we especially love coming up with NEW flavor combinations. This FRUITY and chocolatey cookie mixture is divine, especially with some HOT FUDGE drizzled over top!


Raspberry Oreo Ice Cream
2 cups whole milk
1 1/8 cups sugar
2 1/2 cups heavy cream
1 tablespoon vanilla
3/4 cup fresh or frozen raspberries
15 to 20 Oreos, chopped

In a bowl, combine the milk and sugar until the sugar is dissolved. Stir in the cream and vanilla then add mixture to ice cream maker. Use ice cream maker as directed. About 5 to 10 minutes before ice cream is done, slowly add the raspberries and cookies while ice cream maker is still running. When done the ice cream will be really soft, so we like to put it in a container in the freezer for a couple of hours before serving. Mmmmm!

TIP: You can any other fruit and cookie or chocolate combination. Strawberries would be yummy with the cookies or with chocolate chips. We've done fresh cherries with chocolate chunks, or chopped peaches would be really yummy with Golden Oreos. You can get really creative and add a teaspoon or two of other flavorings like coconut, almond, or mint if you just do cookies or chocolate and leave out the fruit!

Jumat, 21 Desember 2012

Texas French Toast Bake

Technically, I suppose “French” toast isn’t Texan. But this scrumptious French Toast Bake is big and hearty, and the saying goes that everything is bigger in Texas.


What makes this French Toast Bake superb is the use of Texas Toast, in place of regular sliced bread. If you aren’t familiar with Texas Toast, it is typically found in the sliced bread aisle of grocery stores, and the thing about it is… well, it’s Texas-sized. It looks like white bread, sliced extra thick and made extra dense.


I usually buy whole-grain bread, so it’s something special for me to reach for the enriched stuff. Though whole-grain sandwich bread has come a long way in texture and flavor, the white slices brought me back to my childhood. Back when wheat bread tasted like cardboard and my mom kindly bought us white loaves. It’s a special occasion to bite into these Texas soft slices. It’s hard not to cheat and eat the bread straight out of the bag. Just remember that you’ll need to use almost the entire loaf for the French Toast Bake, so try. Just try.


This is one of the most ideal, no-fuss offerings for brunch on Christmas, New Years, or any weekend morning. It’s simple to assemble the night before. Wake up late the next morning, pop it in the oven, and give your family a carefree smile. My family loves anything French Toast-ish, and they flipped for this one. Devoured the whole pan the same day. I’m talking no leftovers, not even a few crumbs.


This Texas French Toast Bake is something that will easily go on your family’s list of favorites. The thick, dense slices of Texas Toast soak up the custard perfectly. The brown sugar, vanilla, and cinnamon meld together like magic. It’s just the right amount of sweetness. You can serve with pure maple syrup, but you might not need it.

Oh, this is important – be sure to scrape out all the gooey yummy goodness you’ll find on the bottom of pan. Enjoy!

__________________________________________________________________________________

RECIPE (one 9×13 pan)

INGREDIENTS

1/2 cup melted butter (1 stick)
1 cup packed light brown sugar
1 loaf Texas Toast
4 large eggs
1 1/2 cup whole milk
1 TB vanilla extract
2 TB light brown sugar, mixed with 2 tsp cinnamon
Powdered sugar for sprinkling
Real maple syrup for serving, if desired

DIRECTIONS

Put butter in a microwave safe bowl and microwave in 20 second increments, stirring in between, until melted. Add 1 cup brown sugar and stir until well incorporated Pour into bottom of a greased 9×13 pan, spreading mixture evenly.

Beat eggs, milk, and vanilla until incorporated. Set aside.

Lay a single layer of Texas Toast in pan, cutting pieces to fit if needed. Spoon 1 cup of egg mixture over bread. Sprinkle with half of the brown sugar/cinnamon mixture. Repeat with second layer, ending with a sprinkling of brown sugar/cinnamon mixture.

Cover tightly and chill overnight in fridge.

Bake at 350F for 40-45 minutes, covered for the first 30 minutes, and uncovered after that. Sprinkle with powdered sugar. If desired, serve with pure maple syrup.

Rabu, 19 Desember 2012

RESEP SAYAP AYAM MAK NYOOOSSS


BAHAN :
Sayap ayam 500 gram
Air kelapa 500 ml
Minyak goreng secukunya
BUMBU :
• Bawang putih 6 siung, parut
• Jahe segar 3 cm, parut
• Kecap asin 3 sendok makan
• Kecap manis 4 sendok makan
• Saus tomat 1 botol sedang
• Saus tiram 1 sendok makan
• Madu 4 sendok makan
▪ Minyak wijen 1 sendok makan
▪ Garam 1/2 sendok teh
Merica bubuk 1/2 sendok teh

CARA MEMBUAT SAYAP AYAM MAK NYOOOSSS :

1. Campur sayap ayam, air kelapa dan bumbu dalam panci lalu aduk rata.
2. Masak dengan api sedang hingga air meresap dan sayap agak kering, angkat.
3. Goreng sebentar lalu angkat dan tiriskan.
4. Sajikan hangat.

Lama Persiapan : 30 menit
Lama Memasak : 45 menit
Standar Hasil Jadi : 5 porsi

RESEP SARDEN ISI


RESEP SARDEN ISIAPA boleh buat, kita akan kembali memasak sarden. Tetapi kali ini dengan isian. Suatu variasi hidangan sarden yang menjanjikan kelezatan tiada tara. Sungguh unik dan sedap. Bila Anda berhasil memasak Sarden Isi dengan benar, berarti Anda sudah menjadi ratu rumah tangga yang luar biasa. Sekarang, buktikanlah.

BAHAN YANG DIPERLUKAN :

1 kg ikan sarden segar
1/4 minyak
1/2 sdm gula
1 sdm daun seledri segar yang diiris halus
2 bawang merah diiris halus
garam dan lada hitam secukupnya
irisan jeruk nipis untuk hiasan
1/4 gelas anggur
20 gr ikan teri ditumbuk.

CARA PEMBUATAN SARDEN ISI :
1. Panaskan terlebih dulu oven sampai 180 derajat celcius. Buang kepala ikan. Belah perut masing-masing ikan sarden dan
buang isinya. Angkat dan buang tulang belakang dengan menggunakan jari Anda untuk menariknya dari kulit secara
perlahan-lahan. Potong di ujung tulang di ekor. Lalu cuci dengan air garam dan keringkan dengan kertas tisu.
2. Panaskan setengah minyak yang dibutuhkan ke dalam penggorengan. Masukkan ikan ten dan goreng hingga matang.
Sesudah itu angkat dan keringkan.
3. Masukkan ikan teri yang sudah dikeringkan, gula, daun seledri, bawang merah,
garam dan lada ke dalam perut ikan sarden, masingmasing sebanyak 2 sendok teh.
4. Susun ikan sarden yang telah diisi di atas piring saji tahan panas yang telah terlebih dulu diberi minyak.
Tuang sisa campuran untuk isian tadi di atas sarden. Masak selama 30 menit,
Lalu hidangankan dengan senyuman bahagia.

Nikmati dan rasakan kelezatan ikan sarden dengan isian sederhana: ikan teri,
jeruk nipis, dan daun seledri. Bila Anda menyakikan hidangan ini, puji-pujian
akan Anda terima dari seluruh keluarga. Lakukanlah!

Senin, 17 Desember 2012

Warm Farfalle Salad


The holidays can be a difficult period, what with the unending parade of dense and rich foods. I desperately needed a break from it yesterday. I started removing cans from the pantry and rummaging through the refrigerator and this is what I came up with. I will just call it a warm pasta salad. It is fresh and full of convenient and easy to prepare vegetables. The bottom line is that you chop up some veggies and toss them in the warm pot out of which you just poured the boiling pasta. Thus, it is a bit warm, but not hot. It has a simple lemon vinaigrette and is topped with feta. I bet you have already thought of a million ways to bend this salad to your will. Add tuna or some leftover turkey to make it a little more substantial.

So start a pot to boil, and get ready to do a little chopping. A few easy meals like this and you may be ready for some for more holiday feasts before you know it. Save the leftovers in the fridge for an easy lunch.
Preparation: (serves 4)

1 medium carrot, peeled and julienned
1 can artichoke hearts, drained and chopped
1 can garbanzo beans, drained
1 cup baby spinach leaves, cut into thin slices
1 stalk celery, diced
¼ teaspoon lemon zest
½ pound farfalle pasta
¼ cup lemon juice
⅔ cup grapeseed oil (or olive oil)
¼ teaspoon salt
¼ teaspoon freshly cracked black pepper
¼ teaspoon sugar
½ cup feta cheese, crumbled

Boil pasta in a pot of boiling water for 11 minutes. Meanwhile, chop the carrot, artichoke hearts, spinach and celery. Zest a bit of the lemon before cutting it to juice it for the dressing. (I often forget to zest before I halve my lemon and there is nothing more annoying than trying to zest a cut lemon.)
Mix the lemon juice and oil in a bowl with the salt and pepper and whisk to combine.
Drain the pasta through a colander. While the pasta drains, place the beans, and all of the remaining ingredients, except the dressing and feta in the empty (hot) stock pot. Mix in the drained pasta and half of the dressing. Stir to combine the ingredients thoroughly. Taste and add more dressing, as needed.
Season with additional salt and pepper. Pour the warm salad onto a serving platter and top with the crumbled feta. Serve immediately with garlic bread.
Note: Julienne is a very loose term here. Generally, cut them into long and skinny bits. No cooking school teacher in the world would call the cuts I made to that poor carrot “julienne.” It is just the nearest descriptive term. Don’t get hung up on perfect carrots as it utterly defeats the point of such a simple throw-down meal. Also, you should be happy to know that I have confirmed, yet again, that julienne is not only a noun, but a verb. What I did to my spinach might loosely be called “chiffonade” but this is hardly the time or place to get all technical. We are tired…just cause it to be smaller.
Also, while a classic vinaigrette has a 3:1 oil to acid ratio, I rarely fall right on the mark. But, know that when you are putting together a dressing, you really need no recipe…just shoot for that general ratio of oil to acid (citrus, vinegar, or a combination) and then start tasting. Depending on the quality and unique attributes of the ingredients you are using, adjustments will be in order. Just have a little fun with it and customize ’til your heart is content.

Grilled Peaches with Yogurt and Honey


I was just spending some time thinking about the fact that this is a big grilling weekend. In fact, I’ve been a little obsessed about barbecuing lately, because I will be going to Foodways Texas BBQ Camp next month. It is a three day immersion study into the art of smoke and fire in College Station, Texas. I figured that I needed to warm up a little and I’ve spent the last week playing with my Grandpa Virgil’s BBQ sauce recipe, canning the sauce, and getting my Patio Pal smoker in fighting form. That name sounds like it might be a cousin of the Weber, but in fact it is a rather gigantic steel barrel smoker with a fire box and double smoking compartments. It was made in Wichita Falls and I gave it to my husband Pitts back before we were married. I have hit a few home-runs in the gift department, and this is one of the memorable ones. Anyway, it is a rather serious and manly object. And for years, I’ve gladly left the workings up to Pitts. “Here is meat, man…make fire and smoke it.” I would handle procurement and salads and sides and he would “man” the smoker. And we spent many years sitting out behind our house on the other side of town, pre-kids, drinking beer and smoking wonderful meats, and generally goofing off after work and on the weekends.

Now we have moved from that place and time, and we have kids and we don’t drink beer and one of our favorite smoking buddies, so to speak, has died. I cleaned out the monster smoker this past weekend and scraped out a little, though not all, of the gunk on the inside of it. It was not cleaning, so much as some light housekeeping. I still don’t know the difference between funk and excellent seasoning for a smoker but I’m erring on the side of the possibility that it is perfectly seasoned until someone who knows more than I says otherwise. But, as I did it, I thought that there were probably still remnants of those very nights and days stuck in the black walls of that steel pit. And it made me a little sad and happy, in that smiling through a tear or two kind of a way. I don’t miss the long days drinking beer in the backyard, really I don’t. But we do miss Steave and we do, every once in awhile, miss the absolute freedom of those times, if only for an hour or two. And there it all was, memories burnt into the inside of a cooker.
I got a little bit excited about firing it up again. It has been a long time since we threw a brisket on our smoker, and tomorrow I will be doing just that. One of many differences will be that Pitts can only act in an advisory capacity. I am going to learn how to barbecue meat. I’ve read Robb Walsh’s Legends of Texas Barbecue from cover to cover. I’ve got Elizabeth Engelhardt’s Republic of Barbecue dog-eared and ready for more reading while the smoke wafts through the air of Bluffview, likely making some of my neighbors either very jealous or very perturbed, or both. I’ll have one particular neighbor over and bribe her with jars of BBQ sauce to tell me her stories about the inside workings of an honest-to-God barbecue joint. Tomorrow is the first day of hands-on cramming for barbecue camp.
Now, this will be barbecuing as opposed to grilling. I suppose I never really thought about the distinction much before my recent studies. But this peach recipe is for “grilling” peaches. You can even do it inside on a grill pan which distinguishes the act very clearly from barbecuing, which according to Robb, must involve smoke and wood, unless you are in prison. In that case, there is dispensation for cooking in an industrial prison oven.  But, as I pondered my outdoor cooking, of all sorts, which I will do this weekend, I remembered this little jewel of a recipe and thought you might like to see it. I have done a similar treatment with nectarines in a cast iron skillet, but this is all about peaches and honey. And if you live near me, I hope it is all about Texas peaches, Texas honey, and Texas pecans. I do believe that if you search just a little bit, you will even find some Texas Greek-style yogurt. Just make sure it is a firm variety so that you can make a little scoop as opposed to a puddle.
I developed this simple recipe to appear on the Marcus Samuellson website last year. I have a habit of not adequately promoting such a coup because it might appear to be braggadoccio, and now I realize that you…my reason for doing this…may have missed it altogether. That has been a hard thing for me with Pie. Self-promotion has never been my strong suit. I far prefer to just sit back and make myself available for compliments. It doesn’t work so great in this field. Thus, the bevy of “sharing” buttons under each post for Facebook and Twitter and Pinterest. But here it is now. And actually, the timing is perfect.

And it is an easy, sweet little treat that really sings about the season. And if your peaches aren’t ready yet, they will be soon I hope, wherever you are.
Grilled Peaches with Yogurt and Honey:
Preparation (2 servings)
1 peach, cut in half and pit removed
1 tablespoon olive oil
2 heaping tablespoons Greek yogurt
2 tablespoons local honey
2 tablespoons chopped pecans
Lightly coat the flesh and skin of the peach with olive oil. Heat a grill pan over a medium flame. Place the peach halves, cut side down, onto the hot grill pan. Allow the peaches to sit on the grill pan for 8 to 10 minutes or until the peaches have grill marks or a nice golden brown appearance on the cut side. Reduce the heat if they are browning too quickly. Turn the peaches and allow them to cook on the skin side for approximately 5 minutes more. Remove the peaches from the pan and allow them to cool briefly.
(You can also prepare this on an outdoor grill. Simply cook them on the cooler side of the grill and watch them carefully to make sure they are not cooking too quickly. You want them to generally keep their shape and not turn into mush. Softened is good…burnt mush not good…burnt and uncooked not good.)
To plate the dessert, place one peach half on each dish. Place a scoop of yogurt in the hollow of each peach half. Drizzle honey over the yogurt, the peaches and on the dish around the peaches. Sprinkle chopped pecans onto each dish in and around the honey.
Serve immediately.
Notes:
Other great recipes that come to mind for a eve of Summer cookout or picnic are Watermelon and Goat Cheese Bites, Creamy Avocado Dip, Key Lime Pie, Sunshine Slush, Blackberry Lime Popsicles, andOrange Julius Popcicles. And I certainly didn’t mean to imply that one need be imprisoned to have an excuse to make or eat oven brisket. That was just a matter of definitions and barbecue culture. I actually have aterrific oven cooked (though not “barbecue” brisket) recipe that you should look into if you haven’t the energy, time or desire to fire up a smoker. Serve it with Blue Cheese Coleslaw and enjoy!
An important closing thought:
My heartfelt condolences for those families for whom Memorial Day weekend is a time of grief and painful remembrances. Thank you to those families who have given the most that can be given to a nation. And, I’m sorry for your loss.
A special thanks to all of you who are serving or who have retired from the services, and our police officers and firefighters and other first responders. And to the moms, dads, sisters brothers, children and spouses of those still serving, thank you to you as well.

Maine Lobster Bites


Lobster seems to be one of those rarefied experiences that we reserve for only the most special occasions. In fact, I think we often overlook its potential because we assume that it is out of reach…a crazy indulgence. While it is certainly an indulgence, it can be a really wonderful addition to a holiday party, and as an appetizer, a little can go a long way.

I have been around and around over how to best use lobster. I have bought tails, and whole lobsters, and grappled with what a big undertaking it can be. Because, if you are going to use lobster, you definitely want to optimize the experience and make this premium ingredient shine.

I’m in Texas. Let’s face it, I am not a lobster natural, if you will. But that also means that I had to start from the beginning to learn how to use it best. Here is what I learned: Lobster is best cooked immediately. Buying tails out of a refrigerator case is not necessarily optimal. Tails are brilliantly simple, though, I’ll admit. Live whole lobsters allow you to cook them live or just after dispatching the little fellow. This is optimal, but it is also a big production.

I asked a local fishmonger what he would do if his goal was to use lobster for a lobster salad or a traditional lobster roll. His response surprised me. He pulled out a flat, frozen package of lobster meat and told me he would use the frozen meat every time for these. If we lived in Maine, it would be a different story, but I am a landlubber in beef country, and being able to buy high quality Maine lobster meat that was flash-frozen immediately after it was pulled from the ocean and cooked is a really wonderful option.

Plus, if you are anything like me, getting ready for a party, small or large, has as much to do with rounding up Legos and hiding piles of mail and laundry in every available closet as it does cooking. So three cheers for high quality, frozen lobster meat.

The meat I bought was from the claws and body of the lobster, and came in nice sized chunks. I bought a pound of lobster meat which fit perfectly into a pint container. I suppose it would take several whole lobsters to accomplish this amount of picked and chopped meat.

My goal was to create as simple a lobster salad as possible, similar to what you would find in a lobster roll. My ingredient list was simple: good mayonnaise, a little celery, a bit of lemon juice, salt and pepper. Period. Because these are appetizers, I needed a vehicle for the salad, and I chose little rounds of puff pastry. Find puff pastry made with all butter, if possible, but buttered and baked baguette slices are simple and inexpensive as well.

These perfect little lobster salad bites meet all of my requirements for a wonderful appetizer. They require minimal work right before serving, are small enough to eat in one bite, and no utensils are needed. Thus, a guest can grab one and pop it in his or her mouth without juggling a wine glass, a plate or a fork.


So yes, I spent $32 on lobster meat, but only a few more dollars for the rest of the ingredients. I easily made 28 appetizers with the amount of salad a pound of lobster yields. So, at a bit over a dollar a pop, I created a wonderful treat that we just don’t see much around here

.

Preparation:

1 pound thawed Maine lobster meat (about 2½ cups)
½ cup mayonnaise
¼ cup minced celery
½ teaspoon kosher salt
½ teaspoon fresh cracked black pepper
1 package of frozen puff pastry, thawed (or a skinny baguette)

Chop the lobster meat into ¼ to ½” bits. Press the meat with a paper towel to absorb excess water. In a small bowl, mix the lobster and the mayonnaise, starting with only ¼ cup of the mayonnaise and adding more as needed. Mix in the celery, lemon juice, salt and pepper. Chill in the refrigerator until just before the party.

Preheat the oven to 400 degrees. Carefully unroll the puff pastry and cut circles with a 2 inch biscuit cutter. Lay the circles on a baking sheet and cook for 10 minutes or until puffed and golden. Remove the puffs from the oven and allow them to cool until they can be handled. Break each puff in half, so that you have two cup-like sides. Fill each puff half with lobster salad. Place on a serving dish and serve immediately.


Notes: Lobster salad purists may cringe at the thought, but these are also wonderful with a tiny sprinkling of lemon zest and a drop of hot pepper sauce on each puff. Of course, purists probably also cringe at the idea of using frozen lobster meat. If using sliced baguettes, butter the slices generously and bake them in the 400 degree oven for ten minutes or until golden around the edges. Depending on the diameter of the baguette, you will be able to make fewer of the appetizers. Adjust accordingly.

Recetas de navidad: Paté de salmón ahumado

En mi anterior entrada os comentaba que me temía que la siguiente receta también seria dulce y la próxima ya seria salada, he querido cambiar el orden de las publicaciones que tengo previstas para navidad, para que esta sea salada y así vamos descansando un poquito de lo dulce :), aunque no me perdáis de vista porque quedan muchas y deliciosas recetas dulces por publicar.

Bien, ya se van acercando los días festivos y seguro que muchos de vosotros estáis planeando los entrantes, primeros, segundos, platos únicos, postres... Yo ando igual y hoy os traigo un aperitivo que hice en un abrir y cerrar de ojos.

Además podemos prepararlo el día de antes y reservarlo bien tapadito en papel film dentro de la nevera, hasta que vayamos a utilizarlo al día siguiente.


Ingredientes :

100gr de salmón ahumado
80gr de queso de untar -tipo philadelphia-
Perejil para decorar
Tartaletas
Preparación

Cortamos unas tiras finas de salmón ahumado y las reservamos, nos servirán para decorar.

Incorporamos el salmón ahumado y el queso de untar en el vaso de la batidora, batimos todo hasta que quede una mezcla a nuestro gusto.

Ponemos el pate dentro de una manga pastelera con boquilla rizada y rellenamos nuestras tartaletas, decoramos con una tira de salmón ahumado enrolladita y unas hojitas de perejil.

Notas

Yo voy triturando la mezcla poquito a poco porque me gusta que el pate tenga trocitos de salmón cuando esta a mi gusto entonces dejo de batir, si queréis un pate uniforme batiremos hasta que este todo bien integrado.

Si queremos hacer el pate el día de antes, una vez que lo tengamos triturado, lo ponemos en un bol y lo tapamos muy bien con papel film, reservamos en la nevera hasta el día siguiente.


Pintxos: Shrimp Confit and Banderillas


I thought I knew chiles. I certainly use several different varieties in my cooking in fresh, dried, roasted, and pickled states. But, when we were in Spain in October, I encountered a type of chile I’d never tasted or even seen at home before and quickly realized I wouldn’t be able to live without it. In the Basque region, these chiles are called guindillas, and elsewhere they’re sometimes called piparras. They’re skinny and light green and have a mild flavor. We saw pickled ones used again and again in pintxos, and then we also found fresh versions of them at a market. The fresh ones were delicious seared and salted just like padron peppers, and the pickled ones were delightful. I started calculating how many jars of these pickled guindillas I could fit in my suitcases and then wondered how long those jars would last already dreading the day they’d be gone. Later, all those worries were washed away when I learned of an online source for gourmet Spanish food products. At Raposos Gourmet, you can find jars of guindillas, piquillos, Spanish olives oils, rice for paella, pimenton, vinegars, jamon, and more. I received some items to sample including an organic Spanish extra virgin olive oil, a basil olive oil, a rosemary olive oil, a jar of guindillas, and a jar of piquillos. With all of this in hand, I was ready to recreate some of the pintxos we enjoyed so much in San Sebastian. 

There are some traditional types of pintxos, but for the most part, in creating them you’re only limited by your imagination. A common one, and one of my favorites, is the Gilda which is a guindilla pepper, an olive, and an anchovy fillet on a pick. I turned to the book Rustica for inspiration for a couple of other skewered ideas. The first was the Zigala which involves slowly oil poaching shrimp. I cleaned and deveined the shrimp and then skewered each one onto a pick to keep them straight while cooking. I used the Spanish olive oil I had received and brought it to just 170 degree F in a saucepan. You need a thermometer to be sure the temperature doesn’t rise above that point and enough oil in the pan to cover the shrimp. The shrimp sit in the warm bath of oil and you watch as their color slowly changes while they cook. The cooking time will vary depending on the size of the shrimp used, but you can easily watch to see when they are just cooked through. Mine took about 12 minutes or so. In the book, the shrimp was wrapped with a thin slice of jamon before being cooked, but I omitted the ham. The picks used for cooking were removed, and the shrimp were skewered on clean picks for serving along with a chunk of heart of palm and some guindillas. The Zigalas were sprinkled with pimenton before serving. The second pintxo variety I found in the book was Banderillas which are simple stacks of cornichon, pickled carrot, an anchovy-wrapped olive, a piece of piquillo, and another cornichon. 

Food on picks is great for parties, and it’s infinitely adaptable. For instance, the banderillas were supposed to have cocktail onions which would have added a nice white element on the pick, but I skipped them. On the Zigalas, you could use pieces of artichoke hearts instead of hearts of palm and mix up the seafood with some shrimp and some scallops. This was an easy way to recreate some tastes of Spain, and I’m so relieved that I can now easily restock my precious guindillas whenever I want. 

I am a member of the Amazon Affiliate Program.

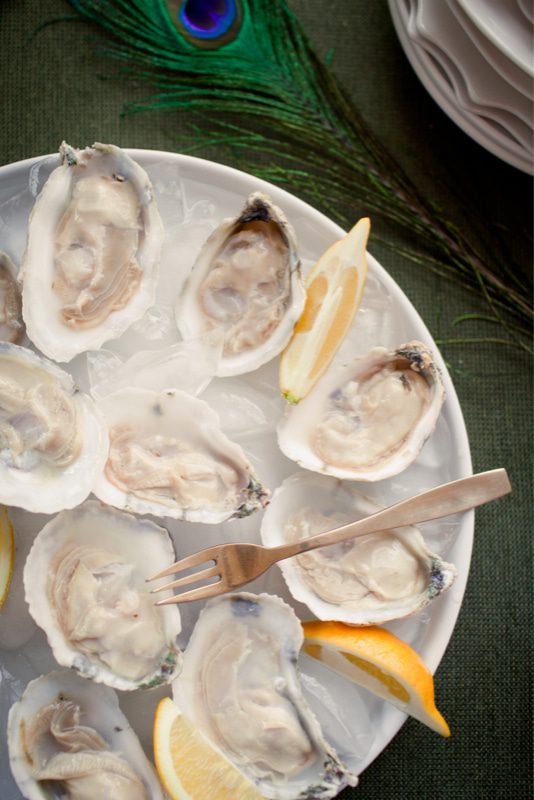
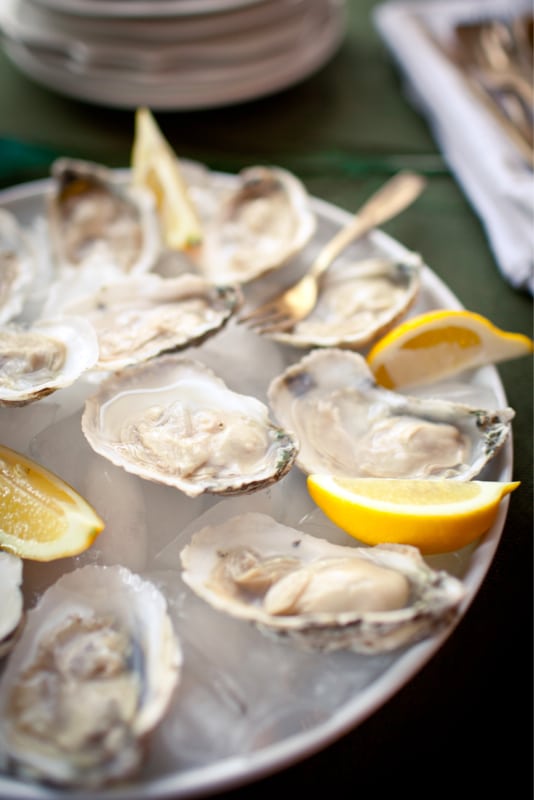
OYSTERS


OYSTERS - Served simply, on the half-shell with a squeeze of lemon. Provide crackers and cocktail sauce for those wary of slurping straight from the shell.
BAKED RICE  - makes 6 cups, enough for 2 batches of gumbo
Ingredients:
2 cups uncooked rice (not instant)
2-1/2 cups high-quality chicken stock
1-1/2 tbsp very finely chopped onions
1-1/2 tbsp very finely chopped celery
1-1/2 tbsp very finely chopped red bell peppers
1-1/2 tbsp unsalted butter, melted
1/2 tsp salt
1/8 tsp garlic powder
a pinch of cayenne pepper
Method:
In a 5x9x2.5 loaf pan, combine all ingredients and mix well. Seal pan snugly with aluminum foil. Bake at 350° until the rice is tender, about 1 hour 10 minutes. Serve immediately.
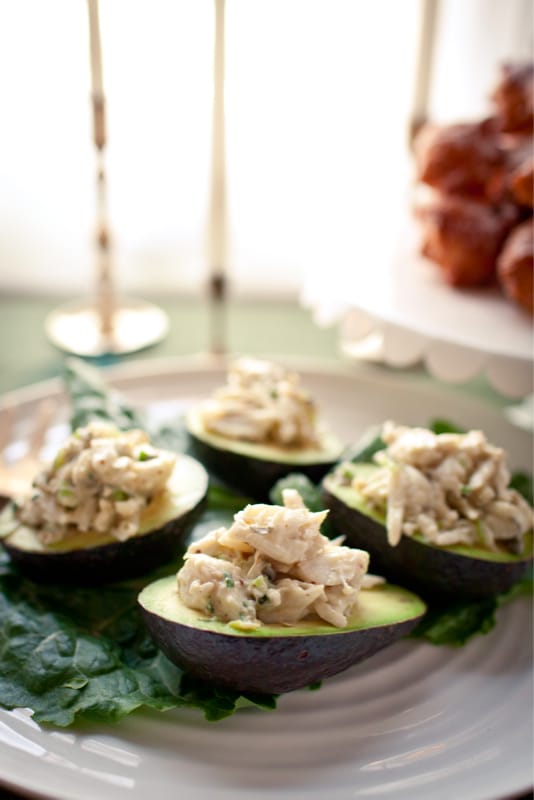
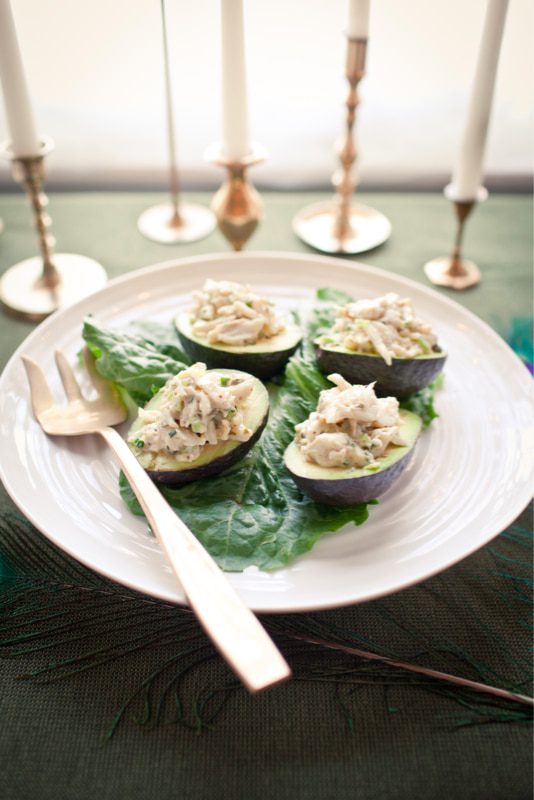
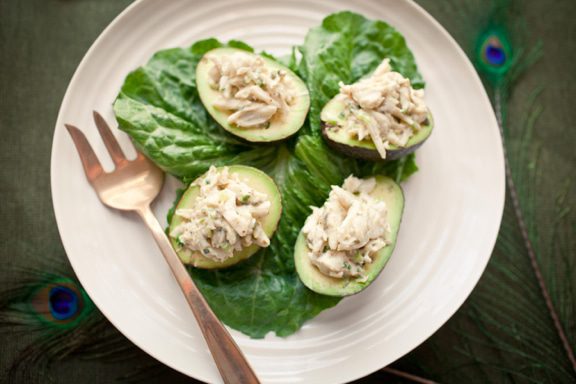
CRAB SALAD-STUFFED AVOCADOS


CRAB SALAD-STUFFED AVOCADOS - serves 8 as an appetizer
Ingredients:
1/2 cup mayonnaise
2 tsp dijon mustard
2 tbsp finely chopped green onions 2 tsp capers, drained and chopped 1/2 cup finely chopped celery
1 pound jumbo lump crab meat salt, freshly-ground black pepper
4 ripe avocados, cut in half
Method:
1. Whisk the mayonnaise, mustard, green onions, capers, and celery together. Gently fold in the crab, making sure to evenly distribute the mayonnaise mixture. Season with salt and pepper.
2. Fill the avocado halves with crab salad and serve immediately.
Blogger Templates